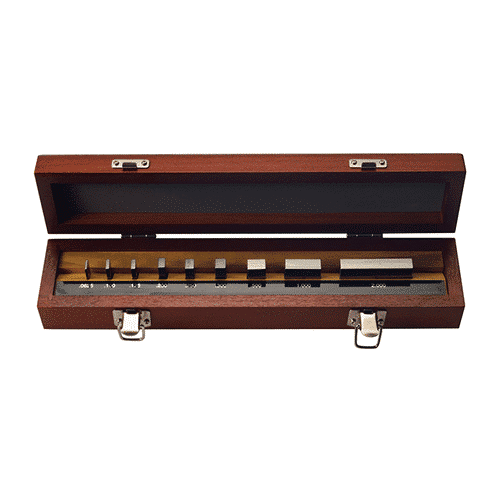
Introduction Mitutoyo 516-934-26 Imperial Gauge Block Rectangular Steel Set, 9 pcs, grade 0
The Mitutoyo 516-934-26 rectangle gage block set includes nine ASME grade 0 steel rectangular gage blocks with nominal size engraved in inches.
Blocks included in the set measure .0625″, .100″, .125″, .200″, .250″, .300″, .500″, 1″, and 2″. Grade 0 gage blocks are often used for calibrating and inspecting tools, instruments, and manufacturing gages.
This Mitutoyo 516-934-26 rectangle gage block set ASME B89.1.9 standards and a certificate of inspection and calibration is provided with each set.
Gage blocks (also called gauge blocks, Jo blocks, Hoke blocks, and Johansson gauges) are precision ground and lapped metal or ceramic blocks, used for calibrating precision measuring equipment and as a length standard in manufacturing. Gage blocks are square or rectangular in shape, with flat and parallel measuring surfaces, and usually have an engraved unique serial number and nominal length (provided in either inches or millimeters).
They often come in sets with blocks of varying lengths, so that many different standard lengths can be created by stacking and wringing them. Wringing is the process of sliding blocks together with a small amount of pressure, in order to create a longer gage block stack. Gage blocks are kept within a protective case, are cleaned thoroughly before wringing and after each use to prevent corrosion, and are kept free of burrs and other damage that would decrease their accuracy. Temperature is another important consideration. Blocks are susceptible to thermal expansion and must be used at 68 degrees F to ensure their accuracy.
Gage blocks are available in different grades, which refer to their tolerance or allowable deviation from their nominal dimension. Grades are defined by the American Society of Mechanical Engineers (ASME) B89.1.9M for both length and flatness. ASME B89.1.9M also defines standards for parallelism and surface finish. Different grades are available depending on the application and the required level of accuracy.
Grade 00 blocks are generally used to calibrate and check the accuracy of instruments, grade 0 blocks for setting and checking gages in quality control, grade AS-1 blocks for tool rooms and production purposes, and grade AS-2 are similar to AS-1 blocks but are slightly less accurate. Grade K blocks are used for calibrating and checking the accuracy of other gage blocks within a temperature-controlled inspection or calibration room. A certificate of inspection and calibration is provided with each gage block or set, specifying the deviation of the individual block from its nominal length.
Features
- Can be used for checking spindle wear on outer diameter OD micrometers
- Sized to check different degrees of spindle rotation
- Steel blocks are made from high-carbon, high-chrome steel to reduce wear and corrosion
- Thermally stabilized to reduce changes in gage block length over time
- Laser-etched with individual serial number for traceability
Specifications Mitutoyo 516-934-26
| 9 Blocks | .0625, .100, .125, .200, .250, .300, .500, 1, 2″ |
| Grade | 0 |
| Optical Parallel | Not Included |
| Type | Steel |

Reviews
There are no reviews yet.