What is a Micrometer?
A micrometer (Screw Gauge) is an extremely helpful device that comes under mechanical instruments. It can measure up to 10 µm or 0.01 mm. Micrometers use a precise screw and nut assembly for measurement. Micrometers are used for most mechanical precision work because of their high accuracy, along with other metrological instruments such as dials, Vernier, and digital calipers.
Micrometer Working Principle
The micrometer working principle is screw-and-nut. The screw is fastened to a thimble or concentric cylinder whose circumference is divided into several equal parts. When the screw is rotated one revolution through a nut, the axial movement is equal to the pitch of the screw’s thread.
If ‘A’ is the pitch or lead of the screw-in mm, then each rotation of the screw advances it by ‘A’ mm about the internal threads. Movement (rotation) of a cylinder through a division means 1/n revolution of the screw or 1/n mm axial advance if the circumference of the concentric cylinder is divided into ‘n’ equal divisions.
The screw commonly used in micrometer instruments has a pitch (lead) of 0.5 mm and a thimble is having 50 divisions, therefore the micrometer’s minimum count is equal to 0.5/50 = 0.01 mm. The axial progress value per circumferential division can be reduced and measurement precision improved by lowering the pitch of the screw thread or increasing the number of divisions on the thimble.
Micrometer Components
▪ Anvil & Spindle Pair
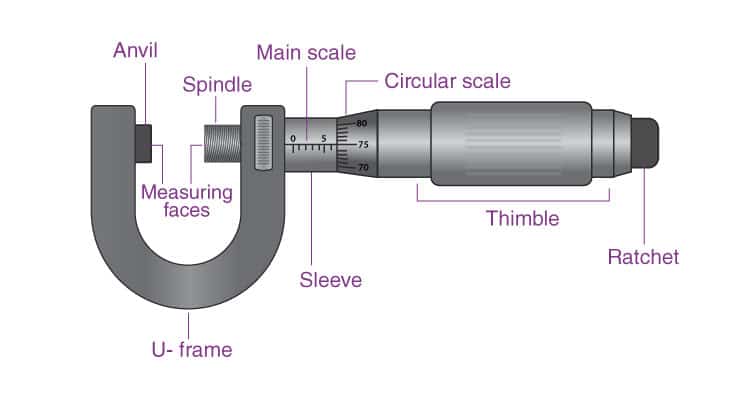
The anvil is a fixed component that protrudes about 3mm from the micrometer left-hand side frame. The anvil’s diameter and the spindle’s diameter are the same. The anvils are accurately ground and lapped and have flat and parallel measuring faces to the spindle. The spindle on the opposite side of the anvil has a moveable measurement face. The nut is engaged to the spindle. Spindle screws and nuts should not have any backlash.
▪ U-Shaped Frame
The external micrometer frame is U-shaped or C-shaped. It connects all of the micrometer components. The space in the frame allows the maximum diameter or length of the workpiece to be measured. The frame is made of steel, cast iron, ductile cast iron, or a light alloy. The micrometer’s frame must have finger grips to incorporate the proper micrometer holding during measurement.
▪ Sleeve
The sleeve contains the micrometer’s main scale, which is accurately divided and marked in 0.5mm divisions along its length. It’s chrome-plated and zero-setting adjustable.
▪ Locknut
When the micrometer is set to the precise reading, a lock nut is applied to the micrometer spindle. The locknut locks the spindle without changing the distance between the measuring faces. So, the spindle remains perfectly aligned.
▪ Ratchet
The ratchet is positioned at the thimble’s end. It ensures accurate measurement and prevents the micrometer from being over-pressed. When the spindle ratches close to the work surface to be measured, the operator tightens the thimble with the ratchet screw. When the correct (uniform) pressure is supplied from the opposite direction, the ratchet will automatically slide, preventing the spindle from being over-pressed on the work surface.
▪ Thimble
The thimble, around its circumference there are 50 equal divisions, will be moved over the barrel to get the perfect measurement.
How to Read Micrometer?
The micrometers generally have a maximum opening of 25mm. Therefore, it has ranged from 0-25mm, 25-50mm, 50-75mm, and alike up to 600 mm. To get accurate micrometer readings, the following steps should be followed:
1. Select the micrometer according to the dimensions range to be measured.
2. Calibrate the micrometer with zero error. Please ensure proper contact between the anvil and the sleeve faces. Check whether the reading is zero or not. Then the reading is not zero, the error must be noted down and it must be incorporated into the final reading.
3. Place the workpiece with the dimension to be measured, between the anvil and the spindle. Then make a final adjustment with the ratchet, and lock with the lock nut.
4. Read the main scale.
Total reading = Main scale reading + (least count x reading on thimble)


